Crochet Cow Keychain Pattern for Beginners in Minutes
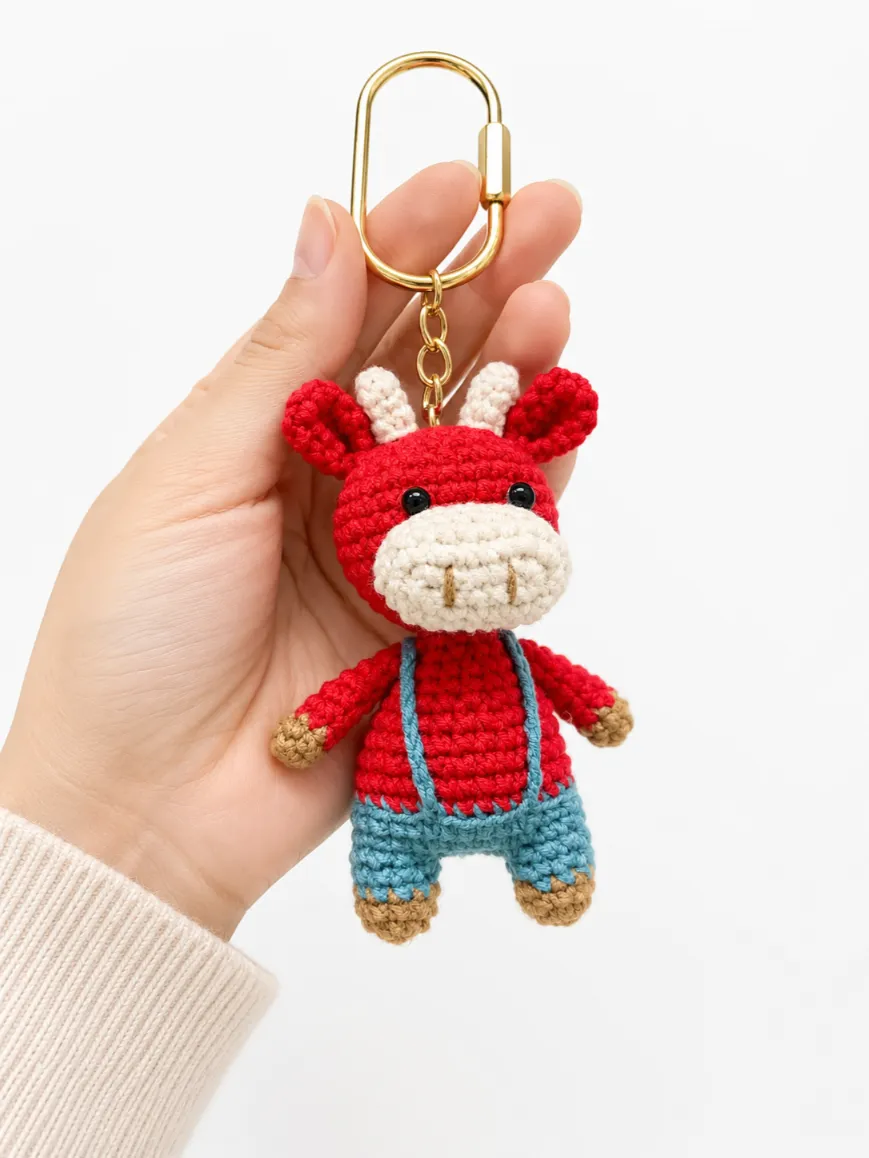
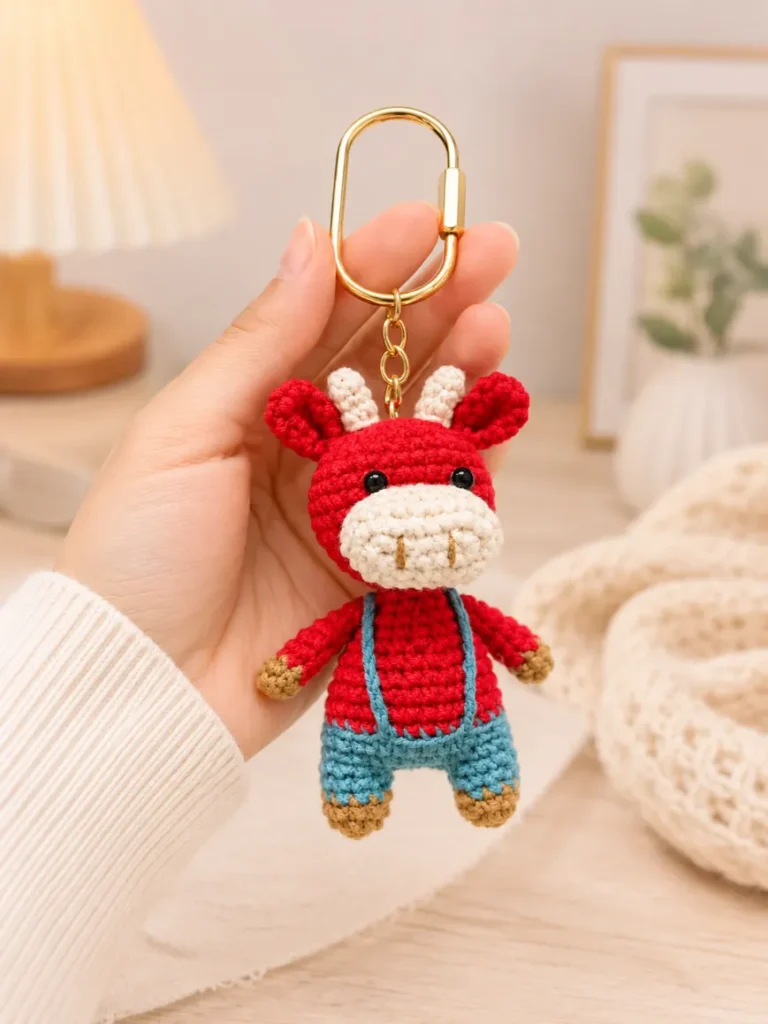
You know that feeling when you want to make something adorable but don’t have weeks to spend crocheting? This crochet cow keychain pattern is exactly what you’ve been waiting for. In just one or two evenings, you’ll have an irresistibly cute mini amigurumi cow dangling from your keys, bag, or gifted to someone special. Whether you’re a complete beginner picking up a crochet hook for the first time or someone who loves quick, satisfying projects, this free pattern delivers pure joy with minimal effort.
Quick Info
Why You’ll Love This Pattern
This free crochet cow keychain pattern hits all the marks for a perfect beginner project. You’ll use only basic stitches, see results quickly, and end up with something genuinely adorable that you’ll be proud to carry or gift away.
- Beginner-friendly: This pattern uses only single crochet, chain, and simple increases and decreases no complicated stitch combinations or color changes required to succeed.
- Quick to make: Experienced crafters finish in under two hours; beginners typically complete one in an evening or two, making it perfect for when you want an instant gratification project.
- Perfect gift: A handmade amigurumi cow charm delights kids, colleagues, best friends, and animal lovers it’s personal without being labor-intensive.
- Free pattern: This complete crochet cow charm pattern requires zero sign-ups, paywalls, or hidden fees just grab the instructions and start stitching today.
New to crochet? Check out our free crochet patterns for beginners to build your skills and confidence with simple projects.
Materials Needed
Gather these simple supplies and you’re ready to begin your miniature cow creation. Each item plays a specific role in bringing your keychain to life.
- Crochet hook: 3.5 mm (size E) this size works perfectly with worsted yarn and creates tight, durable stitches that hold stuffing securely without gaps.
- Worsted weight yarn: White, black, brown, and light brown (approximately 50–80 yards total) worsted yarn is beginner-friendly, affordable, and sturdy enough for items that get handled frequently.
- Polyester fiberfill stuffing keeps your cow plump and squishy without going flat after weeks of use.
- Safety eyes: 8 mm (two pairs) these give your cow personality and charm in an instant (plastic beads work fine if you prefer).
- Scissors for trimming yarn tails.
- Tapestry needle for weaving in ends and sewing all the pieces together securely.
- Stitch markers (optional) helpful for tracking the beginning of each round, especially as a beginner.
- Keychain hardware and split rings to attach your finished cow to keys or bags.
- Optional embellishments: A small decorative bell, ribbon, or embroidery floss in contrasting colors for extra charm.
Pattern Notes & Abbreviations
Before you dive into the mini crochet cow pattern, let’s decode the abbreviations and key techniques used throughout this tutorial.
- MR — Magic Ring (an adjustable loop that eliminates a hole in the center; great for amigurumi)
- ch — chain stitch (the foundation of most crochet projects)
- sc — single crochet (the shortest and tightest basic crochet stitch)
- inc — increase (work 2 single crochets into the same stitch to add width)
- dec — invisible decrease (a technique that joins two stitches neatly without a visible seam)
- sl st — slip stitch (used to join rounds without adding height)
- hdc — half double crochet (taller than single crochet, adds drape)
- dc — double crochet (even taller, creates texture and speed)
This pattern is worked in continuous rounds, meaning you’ll spiral around without joining or turning one of the easiest techniques for beginners. Numbers in parentheses show your stitch count at the end of each round, which helps you track progress and catch mistakes early.
If you’re new to crochet terminology, the official crochet abbreviations guide from the Craft Yarn Council is an excellent resource for understanding common stitches and techniques used in this pattern.
Gauge & Sizing
Gauge for this pattern is approximately 18 stitches and 18 rows over 4 inches in single crochet with the recommended hook and yarn. For a small keychain like this, gauge doesn’t need to be exact your cow will simply be slightly larger or smaller if you use different yarn or a different hook size. The finished keychain is approximately 2–3 inches tall (not including the key ring), making it a perfect pocket-sized companion.
The Crochet Cow Keychain for Beginners in Minutes Pattern
Now for the moment you’ve been waiting for the complete, detailed amigurumi cow keychain tutorial. Read through each round carefully, and don’t hesitate to check YouTube videos if you’re new to any stitch. Beginners, you’ve totally got this.
Abbreviations
MR = Magic Ring | ch = chain | sc = single crochet | inc = increase (2 sc in same stitch) | dec = invisible decrease | sl st = slip stitch | hdc = half double crochet | dc = double crochet
STEP 1 – Legs & Body
Make 2.
Leg 1
Round 1: Magic Ring, 6 sc in ring (6). Pull the ring tight to close the center hole.
Round 2: (sc 1, inc) × 3 times = 9 stitches total (9). You’re widening the leg so it doesn’t look too spindly.
Round 3: 9 sc around (9).
Rounds 4–5: 9 sc in each round (9). Repeat this round twice for a total of two additional rounds.
Fasten off Leg 1, leaving a short tail. Weave it in later.
Leg 2
Round 1: Magic Ring, 6 sc in ring (6).
Round 2: (sc 1, inc) × 3 (9).
Round 3: 9 sc (9).
Rounds 4–5: 9 sc in each round (9).
Do NOT fasten off this leg. Instead, chain 3 stitches and use a slip stitch to join to Leg 1, connecting them at the opening. Now you’ll continue working around both legs as one unit.
Round 6: Working around Leg 1: 9 sc. Working into the chain bridge: 3 sc. Working around Leg 2: 9 sc. Working into the opposite side of the chain bridge: 3 sc (30 stitches total). This creates the transition from legs to body.
Rounds 7–10: 30 sc in each round (30). Work 4 rounds straight to build the body height. Place a stitch marker at the start of Round 7 to help you keep track.
Round 11: (3 sc, dec) × 6 times (24 stitches). You’re shaping the cow by narrowing the body slightly.
Rounds 12–13: 24 sc in each round (24). Repeat this round twice.
Round 14: (2 sc, dec) × 6 times (18 stitches). Decreasing again to make the cow’s neck thinner.
Rounds 15–16: 18 sc in each round (18). Repeat twice.
Round 17: (sc 1, dec) × 6 times (12 stitches). Final shaping before closing.
Round 18: 12 sc (12). Stuff the body firmly with fiberfill. Push stuffing all the way into the legs and up into the body so it’s nice and squishy.
Leave the opening open for now you’ll attach the head through this opening.
STEP 2 – Arms (Make 2)
Round 1: Magic Ring, 6 sc in ring (6).
Round 2: 6 sc (6).
Rounds 3–8: 6 sc in each round (6). Work 6 rounds total of single crochet. Do not stuff the arms they should stay flat and bendy.
Fold the arm flat with the opening at the top. Crochet through both layers using 3 sc to close the opening. Leave a long tail (6 inches) for sewing the arm onto the body later. Repeat for the second arm.
STEP 3 – Horns (Make 2)
Round 1: Magic Ring, 5 sc in ring (5).
Rounds 2–4: 5 sc in each round (5). Work 3 additional rounds, creating a small cone shape.
Do not stuff the horns. Instead, gently pull the yarn tail to close the opening at the top. Leave a long tail (6 inches) for sewing.
STEP 4 – Ears (Make 2)
Round 1: Magic Ring, 5 sc in ring (5).
Round 2: Inc around = 2 sc in every stitch (10 stitches total). Your ear is now roughly fan-shaped.
Rounds 3–5: 10 sc in each round (10). Work 3 rounds straight without increasing or decreasing.
Do not stuff. Fold the ear flat and crochet through both layers with 5 sc to close the opening. Leave a tail for sewing.
STEP 5 – Head
Round 1: Magic Ring, 6 sc in ring (6).
Round 2: Inc around = 2 sc in every stitch (12 stitches total).
Round 3: (sc 1, inc) × 6 times (18 stitches).
Round 4: (sc 1, inc, sc 1) × 6 times (24 stitches). Your head is getting rounder and bigger.
Round 5: (3 sc, inc) × 6 times (30 stitches).
Round 6: (2 sc, inc, 2 sc) × 6 times (36 stitches). Your head should be quite round now.
Rounds 7–11: 36 sc in each round (36). Work 5 rounds straight to give the head height and shape.
Before Round 12: Between Rounds 8 and 9, insert the safety eyes with approximately 5 stitches between them. Insert from the back using the plastic washer to secure them.
Round 12: (2 sc, dec, 2 sc) × 6 times (30 stitches). Begin decreasing to taper the head.
Round 13: (3 sc, dec) × 6 times (24 stitches).
Round 14: (sc 1, dec, sc 1) × 6 times (18 stitches).
Round 15: (sc 1, dec) × 6 times (12 stitches). Stuff the head firmly with fiberfill.
Leave a long tail (8 inches) for sewing the head to the body. Do not fasten off or close the opening yet.
STEP 6 – Muzzle
Round 1: Chain 7 loosely. Working along both sides of the chain foundation: inc, 4 sc, 4 sc in last chain (turn the corner), 4 sc back along the opposite side, sc, inc (16 stitches total). This creates an oval shape for the cow’s snout.
Round 2: sc 1, inc, 4 sc, 4 inc (one in each stitch), 4 sc, sc 1, inc (22 stitches total). You’re making the muzzle rounder and fuller.
Rounds 3–4: 22 sc in each round (22). Work 2 rounds straight.
Stuff the muzzle lightly with a small amount of fiberfill it should be squishy but not as firm as the body. Leave a long tail (8 inches) for sewing to the head.
STEP 7 – Suspenders (Optional Green Straps)
Using green yarn, chain approximately 21 chains to create the length of the suspenders. Adjust the chain length to fit your cow’s body if needed. Cross the straps on the back of the cow and sew them securely onto the pants area of the body.
STEP 8 – Finishing & Assembly
Embroider nostrils: Using light brown yarn and a tapestry needle, create two small stitches on the muzzle to represent nostrils.
Attach eyes: Glue or sew the safety eyes onto the muzzle area above the embroidered nostrils, spacing them proportionally.
Sew muzzle to head: Using the tail you left on the muzzle, stitch it securely to the front of the head using the tapestry needle and the sewing method of your choice.
Sew ears and horns: Using the tails, attach both ears to the top sides of the head and both horns above the ears.
Sew arms: Attach both arms to the sides of the body about two-thirds of the way up.
Sew head to body: Use the tail from the head to stitch it securely to the opening at the top of the body. Weave the needle around the opening several times to ensure it’s tight and won’t pop off.
Attach keychain hardware: Using a small split ring, attach your finished cow to the keychain hardware, then attach the hardware to your keys, bag, or backpack.
Add embellishments: Tie a small ribbon around the cow’s neck and attach a decorative bell if desired for extra charm.
Tips & Troubleshooting
Even the best crafters run into little snags now and then. Here are insider tips to keep your project on track and looking polished.
Yarn Swap
Don’t have worsted weight? DK weight works beautifully for a tinier version, while bulky yarn creates an extra-chunky cow. Just adjust your hook size accordingly (smaller hook for DK, larger for bulky) and expect your stitch counts to shift slightly. The pattern is flexible enough to accommodate different yarn weights as long as you stay consistent throughout.
Common Mistake to Avoid
The biggest beginner error with this beginner crochet keychain pattern is forgetting to stuff as you go. By the time you close the head completely, adding stuffing becomes impossible. Stuff each section (legs, body, head, muzzle) before moving to the next piece think of it like packing a suitcase, section by section.
Finishing Like a Pro
When sewing pieces together, use a whip stitch or mattress stitch rather than just knotting the yarn. Hide your knots inside the seam, not on the surface, and weave
Pin this adorable cow keychain to your beginner projects board and make one today!