Free Crochet Chicken Mini Bag Pattern You’ll Love Making
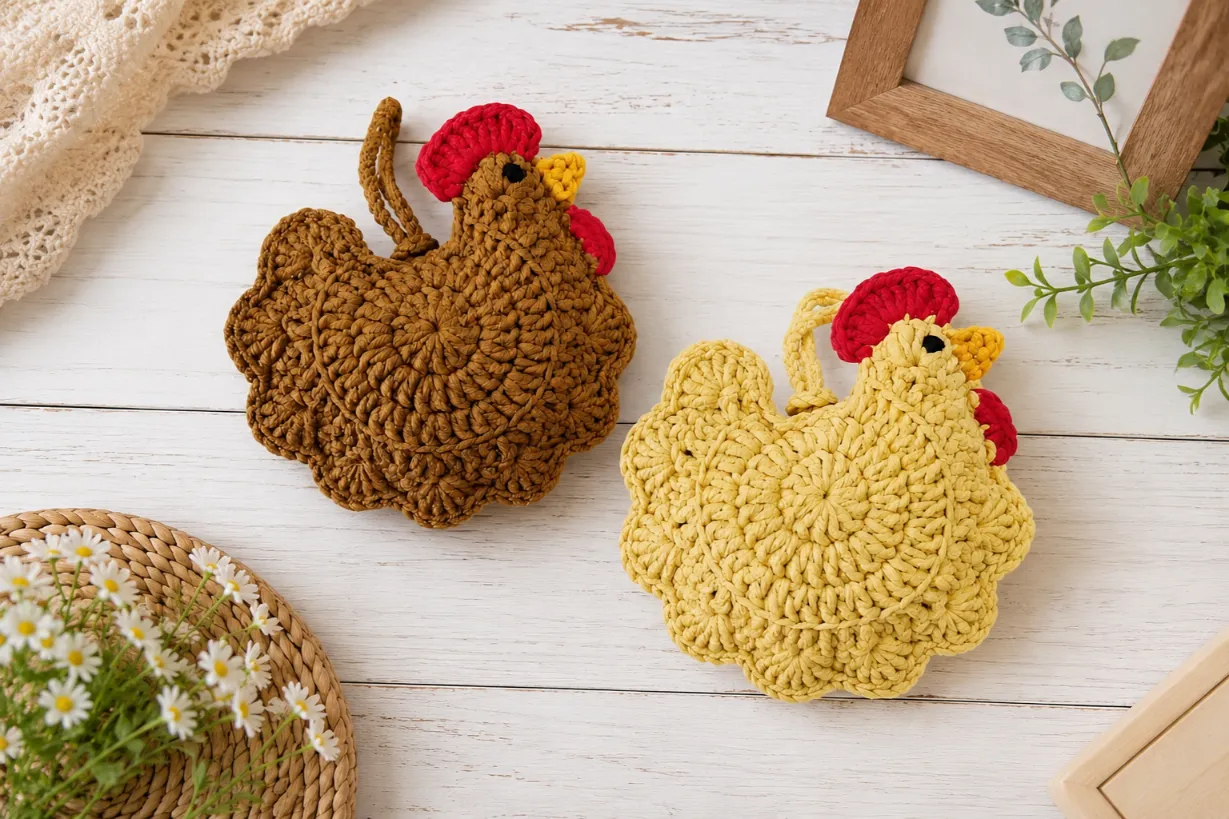
You know that feeling when you spot the cutest little handmade accessory and think, “I want to make that”? This Crochet Chicken Mini Bag Pattern is exactly that moment. Whether you’re a beginner picking up a crochet hook for the first time or an experienced maker looking for a quick, satisfying project, this adorable chicken purse will steal your heart. In just a few hours, you’ll have a charming little bag perfect for holding earbuds, coins, or small treasures and it makes an absolutely precious gift or backpack charm.
Quick Info
Why You’ll Love This Pattern
This crochet chicken bag pattern free download is the perfect blend of cute, practical, and achievable. The instructions are clear enough for absolute beginners, yet the finished result looks professionally made and Instagram-worthy. You’ll feel that satisfying rush of accomplishment when you hold your finished chicken in your hands trust me, it happens.
- Beginner-friendly: This pattern uses only basic stitches like single crochet, double crochet, and slip stitch, making it perfect if you’re new to crochet or want to brush up on fundamentals.
- Quick to make: You can complete both panels in about 2-3 hours, with assembly taking another 30-45 minutes, making this an ideal weekend project or evening craft.
- Perfect gift: Kids adore them, college students love them as backpack charms, and crafters appreciate the handmade charm it’s the gift that makes people smile every time they use it.
- Free pattern: This complete mini chicken purse crochet tutorial costs absolutely nothing and requires no email sign-up or membership.
If you enjoy making cute handmade accessories, you may also love our Crochet Cow Keychain Pattern, another beginner-friendly project that’s perfect for gifts and everyday use.
Materials Needed
Before you cast on, gather these simple materials. Most crafters already have these in their stash, which means you can start today.
- Crochet hook: 2.5mm this size creates a tight, sturdy fabric that holds its shape beautifully and prevents stuffing from peeking through.
- Yarn: 4-strand milk cotton yarn (approximately 100-150 yards total across all colors) cotton creates a crisp, structured finish perfect for a little purse with clean stitch definition.
- Main color: Brown or light yellow (the chicken body) choose whichever makes your heart happy.
- Red yarn: For the comb a small amount, about 10 yards.
- Yellow-orange yarn: For the beak just 5-10 yards needed.
- Black yarn or embroidery floss: For the eyes this adds personality and charm.
- Tapestry needle: Essential for weaving in ends and sewing pieces together with a neat whip stitch.
- Scissors: Sharp yarn scissors make clean cuts and finishing faster.
- Fabric glue (optional): Some crafters use this to secure the comb and beak instead of stitching, which works beautifully.
- Snap button (optional): If you want a closure, a small snap adds functionality and a professional touch.
Pattern Notes & Abbreviations
Before you start, familiarize yourself with these abbreviations. They’re the shorthand of crochet, and once you learn them, patterns become super easy to read and follow.
- ch — chain stitch, the foundation of most crochet projects.
- sc — single crochet, a short, tight stitch.
- hdc — half double crochet, slightly taller than single crochet.
- dc — double crochet, a medium-height stitch used throughout this pattern.
- sl st — slip stitch, used to join rounds and create seamless transitions.
- st(s) — stitch(es).
- rnd — round.
- inc — increase, working two stitches into one stitch to add width.
- sk — skip a stitch, passing over it without working into it.
Important pattern note: This pattern is worked in rounds, and the chain at the beginning of rounds does NOT count as a stitch. Always join with a slip stitch at the end of each round unless otherwise instructed. Use a stitch marker to mark the beginning of each round so you don’t lose your place.
If you’re new to reading crochet patterns, the Craft Yarn Council offers a helpful guide to standard crochet abbreviations and techniques used by designers worldwide.
Gauge & Sizing
Gauge for this pattern is approximately 16 stitches and 12 rows = 4 inches (10cm) in double crochet using a 2.5mm hook with 4-strand cotton yarn. Gauge matters for this project because it ensures your finished chicken bag is the right size small and perfectly proportioned. If your gauge is off, your chicken may come out too large or too small, affecting how it functions as a bag. The finished cute chicken crossbody bag crochet measures approximately 3 inches tall by 2.5 inches wide (excluding the strap). There is one size only for this pattern, making it a universal fit.
The Free Crochet Chicken Mini Bag You’ll Love Making Pattern
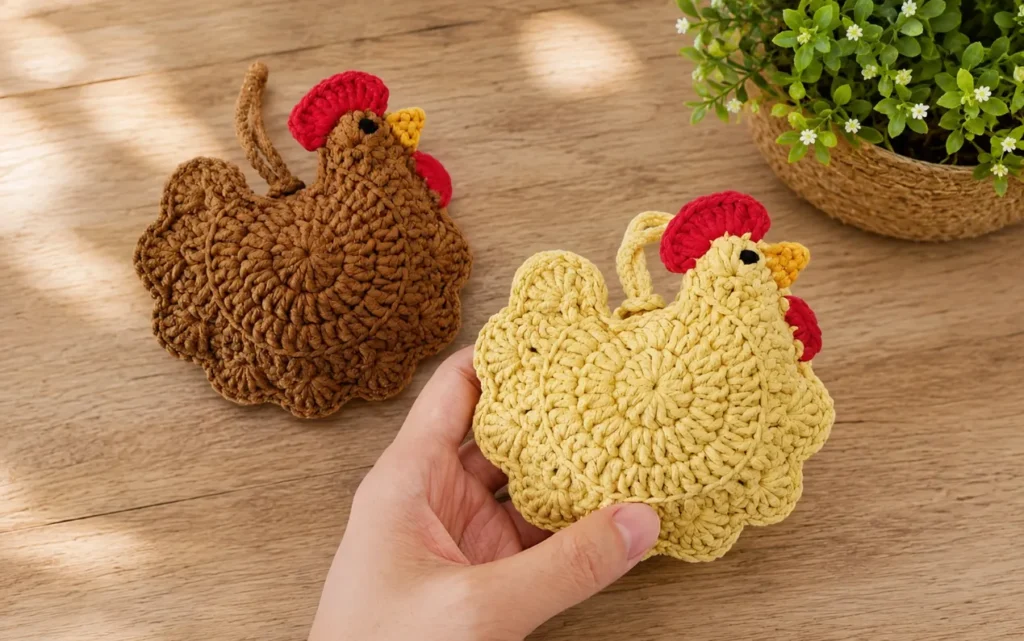
Foundation: You’ll create two identical panels that form the front and back of your chicken bag. The magic ring method starts the pattern.
Round 1: Create a magic ring. Chain 2 (this does not count as a stitch). Work 13 double crochets into the magic ring. Join with a slip stitch to the first double crochet. Total: 13 DC. This small circle becomes the foundation of your chicken’s rounded body shape.
Round 2: Work 2 double crochets into each stitch around the entire circle. Join with a slip stitch to the first stitch. Total: 26 DC. You’ve just doubled your stitch count, which is why your piece begins to expand outward.
Round 3: This is where shaping begins repeat the following pattern 11 times: 1 DC in the next stitch, then 2 DC in the next stitch (this is your increase). After completing 11 repeats, leave the last 4 stitches unworked. Make 2 slip stitches, then turn your work. This creates the flat base where the bag will open, while the increases shape the rounded chicken body.
Round 4: Work into the front loops only (this creates a subtle ridge). Repeat this pattern 8 times: 3 DC in consecutive stitches, then 2 DC in the next stitch (increase). Turn your work. Total: 40 stitches (approximately). Working into the front loops gives depth and visual interest to your finished piece.
Round 5 (Body + Wings): This round creates the distinctive chicken shape with wings. Begin with 1 single crochet in the first stitch. In the next stitch, work 6 double crochets (this creates a shell stitch that fans out like a wing). Skip 1 stitch. Repeat this pattern 7 more times: 1 SC, 6 DC in the next stitch, skip 1 stitch. This creates 8 shell groups that form the chicken’s fluffy body and wings. Total so far: 8 shell groupings.
Continue with the head: Skip 1 stitch. Work 2 single crochets into each of the next 2 stitches (2 increases here). Work 1 half double crochet into the next stitch. Skip 1 stitch. Into the next stitch, work 6 double crochets (another shell for the top of the head). Finish with 1 single crochet in the last stitch. This section shapes the chicken’s head and adds the top comb detail.
Edging: Work 1 slip stitch into every stitch around the entire piece to create a neat, finished edge. You should have approximately 82 slip stitches total. Fasten off and weave in all ends carefully. This edging gives your piece a professional, polished appearance.
Repeat all rounds 1-5 one more time to create the second identical panel. Set both panels aside.
Beak (Small Piece): Using yellow-orange yarn, join yarn under where the comb will sit. Work 3 single crochets. Chain 2. Turn. Make 1 slip stitch into the chain space. Fasten off and weave in ends. This small pointed piece becomes the beak.
Final Assembly: Place your two panels wrong sides together (so the pretty sides face out). Using your tapestry needle and matching yarn, sew around the edges with a whip stitch, leaving the top opening unstitched this is your bag opening. Sew or glue the red comb onto the head. Attach the yellow-orange beak with a few neat stitches. Add a small black embroidered eye using French knots or simple straight stitches. For the strap, crochet a chain of 38 chain stitches, then sew both ends securely to the top of the chicken’s head on both sides. Weave in any remaining ends. Your chicken is complete!
Tips & Troubleshooting
Even experienced crocheters run into little snags. Here’s how to troubleshoot like a pro and make your project even better.
Yarn Swap
While the pattern calls for 4-strand milk cotton, 5-strand cotton works beautifully too and creates an equally sturdy fabric. Acrylic yarn is also acceptable, though cotton has a nicer drape and firmer structure that works best for a small structured bag. If you use a different yarn weight, adjust your hook size to maintain a tight gauge.
Common Mistake to Avoid
The most frequent beginner error is working the chain at the beginning of rounds as a stitch. Remember: the chain-2 does NOT count, so always join your final stitch directly to the first double crochet, not the chain. This prevents your piece from twisting and keeps your stitch count accurate throughout.
Finishing Like a Pro
When sewing your two panels together, use the whip stitch and keep your stitches small and consistent. Weave your needle between stitches rather than piercing yarn, which makes seams invisible. This professional finishing touch is what separates a homemade look from a handmade treasure.
What to Make With This Pattern
This adorable beginner crochet chicken bag isn’t just for yourself the possibilities for gifting are endless. Whether you’re looking for a thoughtful present or a quick craft fair item, these little chickens bring joy to everyone who receives them.
- Stocking stuffer or small gift: Tuck this into a Christmas stocking or give it as a “just because” gift to that friend who loves all things cute and handmade it’s the kind of present people treasure for years.
- Party favor or teacher gift: Make several chickens in different colors and package them together with a thank-you card for teachers, party guests, or as gifts for a child’s classroom celebration.
- Craft fair bestseller: If you’re selling handmade items, this small animal bag crochet pattern is quick enough to make multiples and cute enough to fly off shelves price them competitively and watch them sell.
Looking for more pocket-sized accessories? Browse our collection of Small Crochet Keychain ideas for quick projects that are perfect for gifts, markets, and everyday use.
Frequently Asked Questions
Is this crochet chicken bag pattern really suitable for complete beginners?
Absolutely! This pattern uses only basic stitches (single crochet, double crochet, and slip stitch) with clear instructions. As long as you can cast on a magic ring or chain, you’re ready to make this chicken. Many beginners find this project perfect because it teaches fundamental techniques while creating something adorable and functional right away.
What’s the difference between using cotton yarn versus acrylic, and which should I choose?
Cotton yarn creates a crisper, more structured fabric that holds its shape beautifully, making it ideal for a small bag that gets handled and carried. Acrylic is softer and more forgiving as you learn, though slightly less firm. For this specific project, cotton (especially milk cotton) is recommended, but acrylic works fine if that’s what you have in your stash.
How long does this really take to complete from start to finish?
Most crafters complete both panels in 2-3 hours, then spend another 30-45 minutes on assembly (sewing pieces together, attaching details, and creating the strap). Total time is typically 3-4 hours, making this a perfect project for an afternoon or evening of focused crafting. Your speed will improve with practice.
Can I make larger or smaller versions of this chicken bag, and how would I adjust the pattern?
You can create size variations by using a thicker or thinner yarn with an appropriately sized hook. Thicker yarn and larger hooks create a bigger chicken; thinner yarn and smaller hooks create a tinier version. However, starting with the pattern as written ensures your first chicken turns out beautifully experiment with sizing on your second project once you understand the construction.
Pin this adorable chicken bag to your must-make list and bring smiles wherever you go!
Final Thoughts
You absolutely can make this adorable chicken mini bag, and you’re going to be so proud when you hold that finished project in your hands. The beauty of crochet is that every stitch is a small moment of creativity, and when you put them all together, magic happens. Grab your hook, pick your favorite colors, and dive in then share your finished creation on Pinterest or tag your favorite crochet community. We’d love to see which color chicken you create!