Cute Mini Amigurumi Mushroom Pattern
Looking for a cute mini amigurumi mushroom pattern with cozy cottagecore vibes? This tiny crochet mushroom plush is a soft and beginner-friendly amigurumi project perfect for handmade gifts, kawaii crochet collections, and aesthetic room decor.
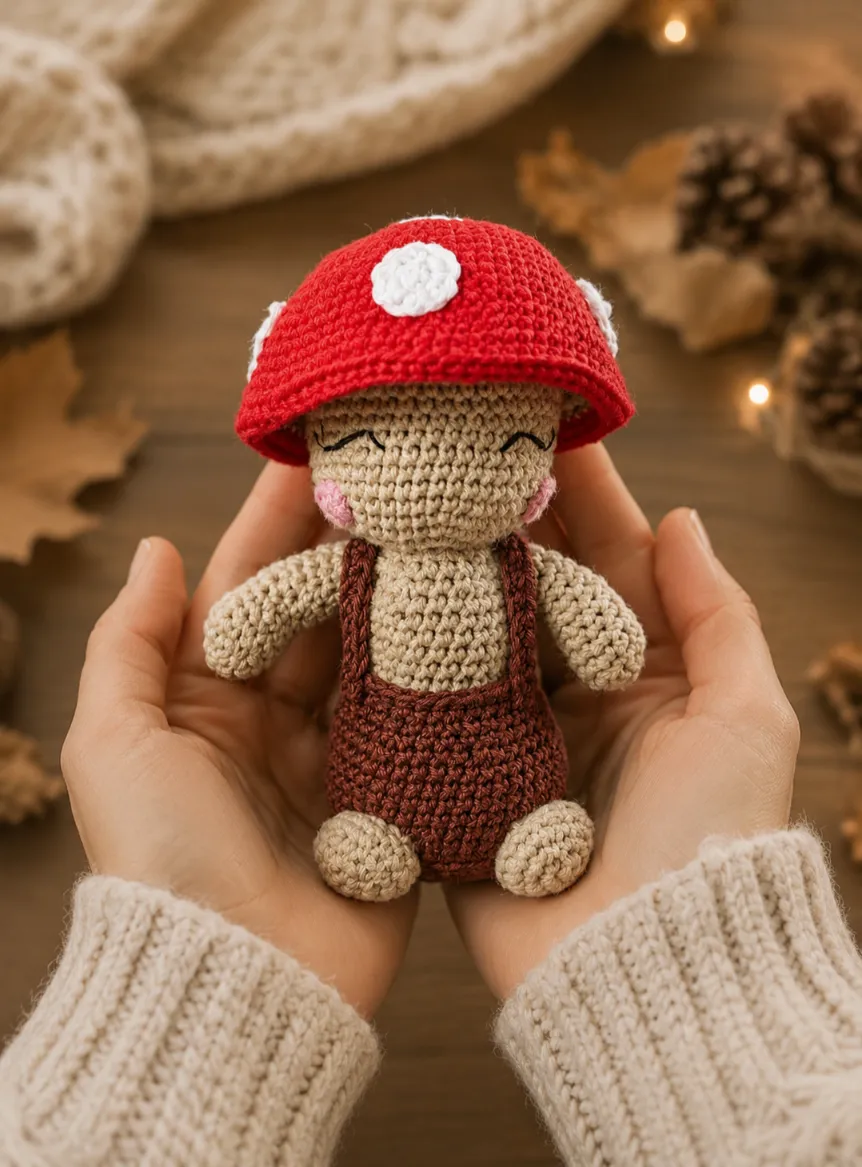
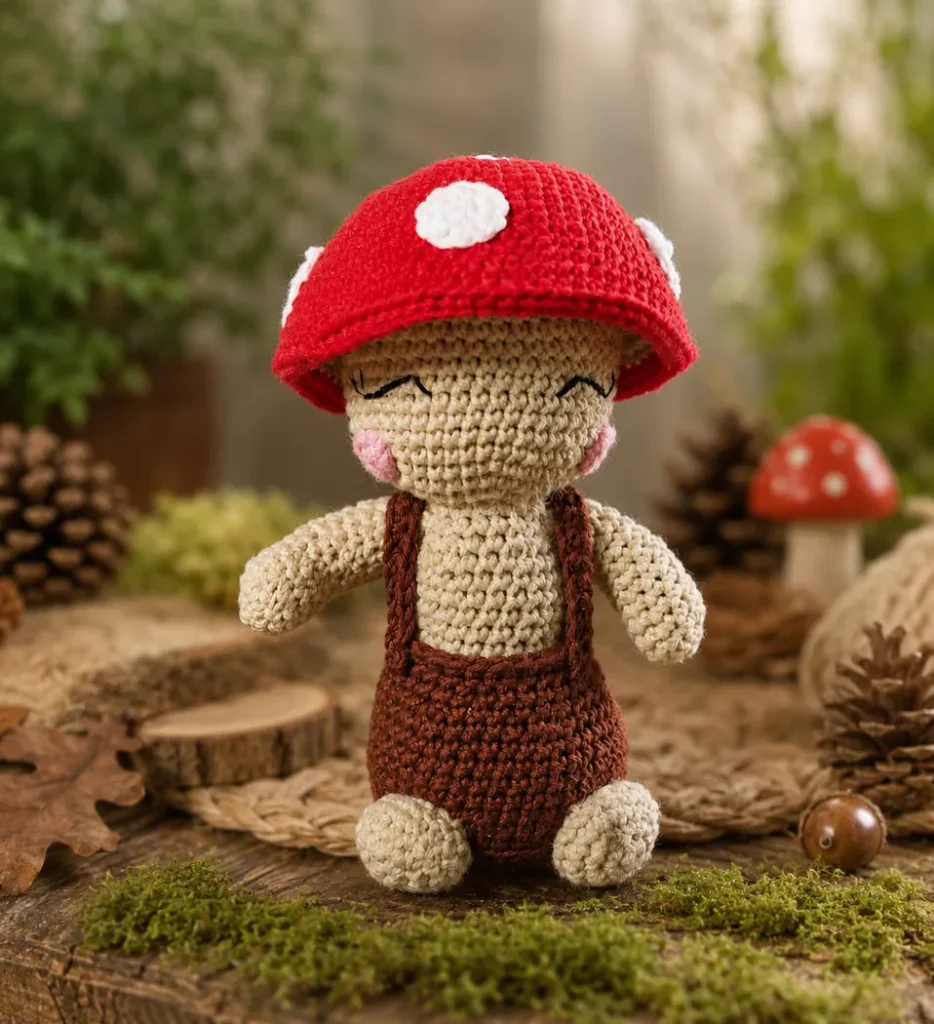
I love this mushroom pattern because the rounded plush shape, tiny embroidered face, and oversized toadstool hat make it feel playful and full of personality. The soft neutral colors combined with the red mushroom cap create the perfect cozy crochet aesthetic trending on TikTok and Pinterest.
This mini amigurumi mushroom is perfect for:
- kawaii crochet collections
- desk decor
- handmade gifts
- cottagecore room decor
- mini plush displays
- cute crochet accessories
If you enjoy small crochet projects and adorable mushroom crochet trends, this mini amigurumi mushroom is a relaxing and rewarding project to make.
You may also enjoy:
- Small Crochet Projects for Beginners
- Tiny Crochet Mushroom Pattern
- Mini Crochet Projects You Can Finish Fast
Quick Answer
A mini amigurumi mushroom pattern is a small plush crochet project made with simple amigurumi shaping, cozy mushroom details, and soft DK yarn. This cute crochet mushroom is perfect for cottagecore decor, handmade gifts, kawaii crochet collections, and aesthetic room accessories.
Why You’ll Love This Mini Amigurumi Mushroom Pattern
This mushroom crochet pattern is:
- soft and beginner-friendly
- cozy and aesthetic
- perfect for cottagecore crochet
- relaxing to make
- fun to customize
The oversized mushroom hat, tiny cheeks, and plush body give the mushroom a soft kawaii style that looks adorable in crochet collections and aesthetic room setups.
This mini mushroom plush works beautifully as:
- shelf decor
- handmade gifts
- crochet market items
- desk accessories
- cozy room decor
Mini mushroom crochet projects are especially popular on:
- TikTok
- Instagram crochet communities
because they feel:
- cute
- collectible
- aesthetic
- cozy
- beginner-friendly
Skill Level
Intermediate Beginner
This pattern includes:
- basic amigurumi stitches
- shaping increases and decreases
- BLO and FLO rounds
- embroidery details
- light sewing and assembly
The repetitive rounds make the mushroom relaxing to crochet once the body shaping begins.
Materials
- Paintbox Cotton DK yarn
- Pillar Red (415)
- Vanilla Cream (408)
- Coffee Bean (411)
- Small amount of pink and white DK yarn
- 3 mm crochet hook
- Stitch marker
- Toy stuffing
- Black stranded cotton
- Tapestry needle
Crochet Abbreviations — US Terms
| Abbreviation | Meaning |
|---|---|
| MR | Magic Ring |
| ch | chain |
| sc | single crochet |
| inc | increase (2 sc in same stitch) |
| dec | decrease |
| sl st | slip stitch |
| BLO | back loop only |
| FLO | front loop only |
| RS | right side |
| st(s) | stitch(es) |
Helpful Crochet Resource
If you want smoother shaping while making your mushroom plush, you can learn the PlanetJune Invisible Decrease Tutorial technique often used in amigurumi to create cleaner decreases and smoother shaping..
Pattern Notes
- The mushroom is made in separate parts and sewn together.
- Work in continuous spiral rounds unless otherwise stated.
- Use a stitch marker to mark the first stitch of each round.
- Stuff pieces gradually while crocheting for smoother shaping.
- Keep tension even for cleaner amigurumi shaping.
Amigurumi Mushroom Pattern
Body
Using Coffee Bean yarn.
Round 1
Ch 1 (does not count as stitch), 6 sc in MR.
[6 sts]
Round 2
2 sc in each stitch around.
[12 sts]
Round 3
(sc in next st, inc in next st) × 6.
[18 sts]
Round 4
(sc in next 2 sts, inc in next st) × 6.
[24 sts]
Round 5
(sc in next 3 sts, inc in next st) × 6.
[30 sts]
Round 6
(sc in next 4 sts, inc in next st) × 6.
[36 sts]
Round 7
(sc in next 5 sts, inc in next st) × 6.
[42 sts]
Round 8
Work in BLO around.
Rounds 9–14
Sc in each stitch around.
Round 15
(sc in next 5 sts, dec) × 6.
[36 sts]
Round 16
(sc in next 4 sts, dec) × 6.
[30 sts]
Rounds 17–18
Sc in each stitch around.
Round 19
Change to Vanilla Cream yarn.
Working in BLO:
(sc in next 3 sts, dec) × 6.
[24 sts]
Stuff as you work.
Rounds 20–24
Sc in each stitch around.
[24 sts]
Round 25
(sc in next 2 sts, dec) × 6.
[18 sts]
Rounds 26–27
Sc in each stitch around.
Fasten off, leaving a long tail.
Join Coffee Bean yarn to any unused front loops from Round 18 and work 1 sc in each stitch around.
Fasten off and weave in ends.
Head
Using Vanilla Cream yarn.
Rounds 1–7
Repeat Rounds 1–7 of Body.
[42 sts]
Rounds 8–20
Sc in each stitch around.
Stuff as you work.
Round 21
(sc in next 5 sts, dec) × 6.
[36 sts]
Round 22
(sc in next 4 sts, dec) × 6.
[30 sts]
Round 23
Working in BLO only:
(sc in next 3 sts, dec) × 6.
[24 sts]
Round 24
(sc in next 2 sts, dec) × 6.
[18 sts]
Round 25
(sc in next st, dec) × 6.
[12 sts]
Round 26
Sc in each stitch around.
Round 27
(sc in next 7 sts, dec) × 6.
[48 sts]
Round 28
Sc in each stitch around.
Round 29
(sc in next 6 sts, dec) × 6.
[42 sts]
Round 30
Sc in each stitch around.
Round 31
(sc in next 5 sts, dec) × 6.
[36 sts]
Round 32
(sc in next 4 sts, dec) × 6.
[30 sts]
Round 33
Working in BLO only:
(sc in next 3 sts, dec) × 6.
[24 sts]
Round 34
(sc in next 2 sts, dec) × 6.
[18 sts]
Round 35
(sc in next st, dec) × 6.
[12 sts]
Round 36
(dec) × 6.
[6 sts]
Fasten off.
Thread tail through front loops of remaining stitches and pull tight to close.
Using the image as guide, embroider the eyes over Rounds 11–12 using black stranded cotton.
Cheeks (Make 2)
Using pink yarn.
Round 1
Ch 1, 6 sc in MR, sl st to beginning dc.
[6 sts]
Fasten off leaving a long tail.
Pin cheeks onto face and sew in place.
Toadstool Hat
Using Pillar Red yarn.
Rounds 1–7
Repeat Rounds 1–7 of Body.
[42 sts]
Round 8
Sc in each stitch around.
Round 9
(sc in next 6 sts, inc in next st) × 6.
[48 sts]
Round 10
Sc in each stitch around.
Round 11
(sc in next 7 sts, inc in next st) × 6.
[54 sts]
Round 12
Sc in each stitch around.
Round 13
(sc in next 8 sts, inc in next st) × 6.
[60 sts]
Round 14
Sc in each stitch around.
Round 15
(sc in next 9 sts, inc in next st) × 6.
[66 sts]
Round 16
(sc in next 10 sts, inc in next st) × 6.
[72 sts]
Rounds 17–18
Sc in each stitch around.
Rounds 19–20
Sc in BLO around.
Round 21
Change to Vanilla Cream yarn.
Sc in each stitch around.
Round 22
(sc in next 10 sts, dec) × 6.
[66 sts]
Round 23
(sc in next 9 sts, dec) × 6.
[60 sts]
Round 24
Sc in each stitch around.
Round 25
(sc in next 8 sts, dec) × 6.
[54 sts]
Round 26
Sc in each stitch around.
Round 27
(sc in next 7 sts, dec) × 6.
[48 sts]
Round 28
Sc in each stitch around.
Round 29
(sc in next 6 sts, dec) × 6.
[42 sts]
Round 30
Sc in each stitch around.
Round 31
(sc in next 5 sts, dec) × 6.
[36 sts]
Round 32
(sc in next 4 sts, dec) × 6.
[30 sts]
Round 33
Working in BLO only:
(sc in next 3 sts, dec) × 6.
[24 sts]
Round 34
(sc in next 2 sts, dec) × 6.
[18 sts]
Round 35
(sc in next st, dec) × 6.
[12 sts]
Round 36
(dec) × 6.
[6 sts]
Fasten off.
Place the hat onto the head lining up unused front loops from Round 23 of the head with unused front loops from Round 32 of the hat.
Sew together and curve the top of the hat downward to shape.
Spots (Make 5)
Using white yarn.
Round 1
Ch 1, 6 sc in MR.
[6 sts]
Round 2
Inc in each stitch around, sl st in next stitch.
[12 sts]
Fasten off.
Sew spots around the top of the hat.
Feet (Make 2)
Using Vanilla Cream yarn.
Round 1
Ch 1, 6 sc in MR.
[6 sts]
Round 2
(3 sc in next stitch, 2 sc in next stitch, sc in next stitch) × 2.
[12 sts]
Round 3
Sc in next stitch, 2 sc in next 3 sts, sc in next 3 sts, dc in last 2 sts.
[18 sts]
Rounds 4–5
Sc in each stitch around.
Round 6
(sc in next stitch, dec) × 6.
[12 sts]
Fasten off leaving a long tail.
Stuff feet firmly.
Pin feet to body over Rounds 8–11 and sew in place.
Arms (Make 2)
Using Vanilla Cream yarn.
Round 1
Ch 1, 6 sc in MR.
[6 sts]
Round 2
2 sc in each stitch around.
[12 sts]
Rounds 3–5
Sc in each stitch around.
Round 6
Sc in next 4 sts, dec twice, sc in next 4 sts.
[10 sts]
Round 7
Sc in next 4 sts, dec, sc in next 4 sts.
[9 sts]
Stuff lightly.
Rounds 8–14
Sc in each stitch around.
Fasten off.
Sew arms onto sides of body.
Dungaree Straps (Make 2)
Using Coffee Bean yarn.
Row 1
Ch 22.
Htr in 2nd chain from hook and in each chain to end.
[21 htr]
Fasten off.
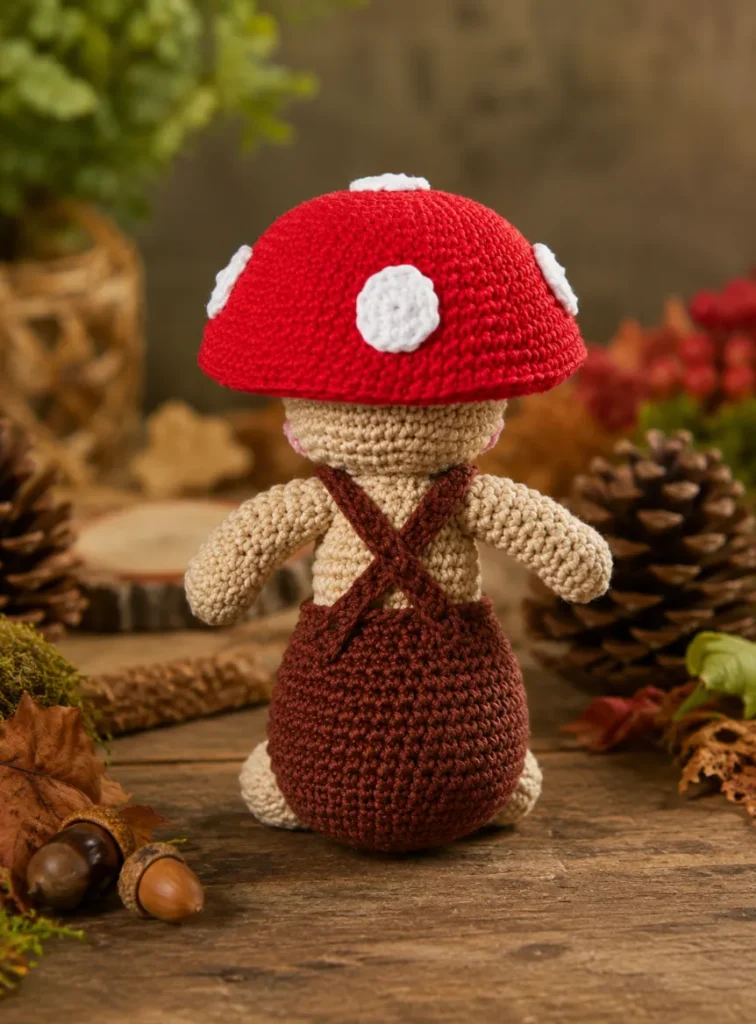
Pin straps to top edge of Round 18 on body front.
Cross straps over shoulders and back, then pin ends to Round 18 at back.
Sew in place and weave in ends.
Assembly Tips
- Stuff the mushroom gradually for smoother shaping
- Keep stitches tight to avoid stuffing gaps
- Pin all pieces before sewing permanently
- Curve the mushroom hat downward gently for a softer cottagecore look
- Embroider the face slowly for a cleaner kawaii expression
The oversized mushroom hat and tiny plush body give this mini amigurumi mushroom its cozy handmade look.
Customization Ideas
This mini amigurumi mushroom pattern is easy to customize with different yarn colors and tiny accessories.
You can create:
- pastel mushroom plushies
- forest-themed mushrooms
- autumn cottagecore mushrooms
- kawaii pink mushrooms
- tiny woodland plush collections
You can also:
- embroider sleepy eyes
- add blush cheeks
- use fluffy yarn textures
- attach mini bows
- create matching mushroom families
Mini mushroom crochet plushies are especially popular for:
- aesthetic room decor
- kawaii crochet collections
- handmade gifts
- crochet markets
- TikTok crochet videos
- Pinterest crochet inspiration
Tips for a Neat Finish
Use Tight Stitches
Tight stitches help the mushroom:
- hold its shape better
- prevent stuffing from showing
- create cleaner amigurumi texture
Cotton yarn works especially well for mini amigurumi projects because it gives better stitch definition.
Stuff Gradually
Stuff the:
- body
- head
- feet
slowly while crocheting.
This helps create:
- smoother shaping
- softer curves
- more balanced proportions
Avoid overstuffing the mushroom hat so it keeps a softer curved shape.
Pin Pieces Before Sewing
Before attaching:
- arms
- feet
- cheeks
- hat
pin the pieces in place first.
This helps keep:
- facial symmetry
- balanced proportions
- cleaner final assembly
Shape the Hat Gently
The mushroom hat looks best when curved slightly downward.
After sewing:
- gently shape the hat with your hands
- adjust the curve naturally
- avoid flattening the mushroom top
This creates the cozy cottagecore mushroom look.
Ways to Use This Mini Amigurumi Mushroom
This mini crochet mushroom works beautifully as:
- shelf decor
- desk accessories
- handmade gifts
- crochet market items
- kawaii room decor
- woodland crochet collections
It is also perfect for:
- cottagecore crochet displays
- TikTok crochet videos
- Pinterest crochet inspiration
- autumn crochet collections
- cozy aesthetic photos
The soft mushroom colors and rounded plush shape make this mini amigurumi especially cute for seasonal crochet collections.
FAQ
Is this mini amigurumi mushroom beginner-friendly?
This pattern is best for intermediate beginners because it includes shaping, BLO/FLO rounds, embroidery, stuffing, and assembly.
What yarn works best for this mushroom pattern?
DK cotton yarn works best because it creates clean stitches and helps the mushroom hold its rounded shape.
Can I make this mushroom in different colors?
Absolutely. You can create:
- pastel mushrooms
- autumn mushrooms
- forest mushrooms
- kawaii pink mushrooms
- neutral cottagecore mushrooms
using different yarn combinations.
Why does the mushroom use BLO and FLO rounds?
The BLO and FLO rounds help create shaping details and allow cleaner attachment points for the mushroom pieces.
nt points for the mushroom hat and body sections.
Final Thoughts
This cute mini amigurumi mushroom pattern is a cozy crochet project perfect for cottagecore decor, kawaii crochet collections, and handmade gifts.
The oversized mushroom hat, tiny embroidered face, and plush rounded body give this mini crochet mushroom lots of personality while keeping the project relaxing and rewarding to make.
If you enjoy small crochet projects and aesthetic amigurumi plushies, this mushroom pattern is a beautiful addition to your handmade crochet collection.